A few weeks ago I was on a shoot out of Auckland. I was commissioned as a cameraman on a documentary that required some B-roll and then a studio setup for some interviews on a black background.
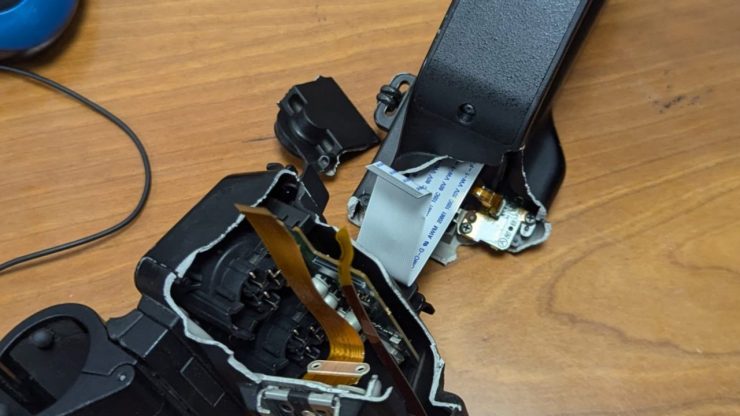
While I was setting up for the studio part of the day, for the first time after many years, I was careless and allowed a pretty serious accident to happen. I didn’t realize that I had not fully opened the legs of my 100mm Flowtech that held my Sony FX6 on it, resulting in the whole rig tipping over and landing on the ground face first. There was no time to catch it; there was just a frozen look on the ground at the various pieces the camera was now in. This was a potential disaster since we had not yet started our studio interviews.
A quick assessment with the camera still off showed that the viewfinder mount rod took the brunt of the fall, snapping the FX6 handle in 3 pieces. After powering up the camera, it did function but seemed to freeze. Knowing that the FX6 has a data connection to the handle, I thought the freeze could be from the damaged handle, so I took it off. Once that was off, the camera powered up fine and was ready to rock and roll, but without sound, as the sound connectors of the FX6 are located on the handle.
Fortunately, I have recently purchased the Deity Theos wireless mic system that has 32-bit internal recording on the transmitter. So with a timecode sync between FX6 and transmitter and a backup wireless feed going to the B cam (Sony a7IV) I managed to get the job done without a hitch, despite the disaster. And this is when I realized that deep technical knowledge is very useful in this job, especially in situations like this.
After the job was done, I ordered a new handle which was covered by my insurance. When you make a claim the broken part is then property of the insurance company, so I had to return it to the service centre. However, after asking the insurer, they were nice enough to allow me to have the broken handle back as I wanted to run some experiments on it.
The much-discussed FX6 sound circuitry
Since the Sony FX6 was introduced, a big complaint from users has been the inability to input sound in the camera without having the handle on. And this is what I wanted to explore. Does the sound circuitry work without all the other electronics in the handle connected? (Handle custom buttons and controls). If yes, can someone just make a custom box with these parts and utilize the sound ports without the handle?
It seemed that all the boards in the handle were still intact after the fall, so I removed them from the broken part, and after taking a couple of deep breaths, I connected them to the camera and powered it up.
The camera not only didn’t boot up but also required me to remove the battery in order for it to resume normal operation. Initially, I thought that this was because of the lack of the rest of the electronics and abandoned the idea.
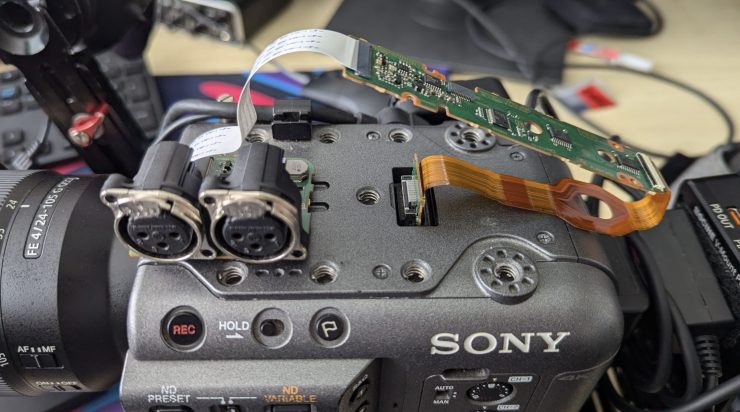
However, I then realized that I had not made sure I connected the ribbon cables correctly (picture above). Going back and tracing how the cables were sitting in the handle I found the correct way of connecting them and gave it another go.
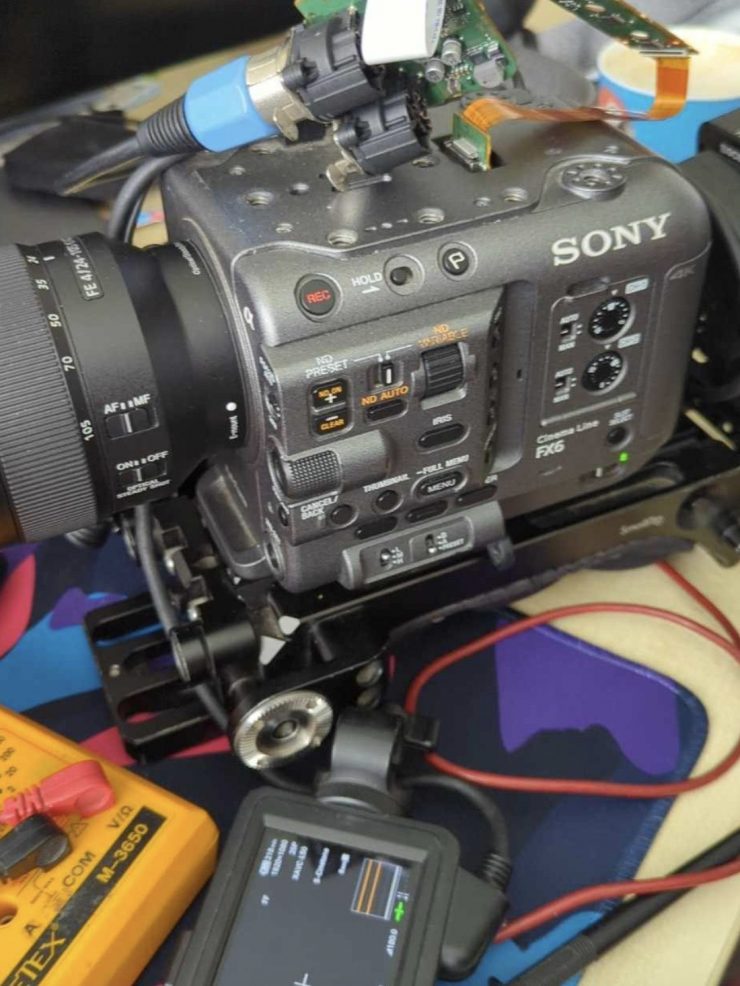
This time it was successful, the camera booted up and also accepted sound from the XLR inputs!
This means that the camera actually protected itself from damage when it sensed the incorrect ribbon placement, a safety feature that probably saved me from a fried camera mainboard. Phew!
The Parts
DISCLAIMER
By using the information provided below, you acknowledge and agree that any actions you take based on this information are at your own risk. I am not responsible for any outcomes related to the use of this information, including but not limited to, any damage to your camera or other equipment.
This is what most people will be here for. Since the interest in creating a sound input to the FX6 without the handle is large, here are my findings with full details and part numbers.
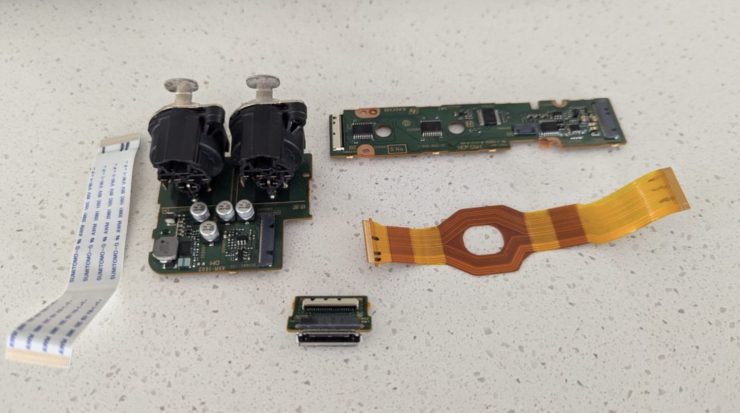
In order for the camera to accept sound it needs 2 boards, 2 ribbon cables, and one connector, a total of 5 parts.
The parts required for sound import into the Sony FX6 are the following:
1. The connector

This is the part that connects to the camera body. It is a proprietary Sony connector with the code number HC1002 Board Connector In Handle. A quick Google search currently shows that part is available both on eBay and AliExpress at a cost of $54 USD.
2. The data cable

This is another proprietary Sony part with the model name FP-2470 Flex Cable. It connects the HC1002 Board connector on one side and the HN-1054 driver board on the other. It is available on eBay at a cost of $37 USD.
3. Top handle PCB

This is the main board where all the data gets encoded and passed on to the camera body. Alongside the main sound, this board is also responsible for the top handle controller encoding and the internal handle mic sound. Its Sony part number is HN-1054 and is currently available on eBay for $126 USD.
4. Sound connection flexi cable

The Sumitomo AWM 20861 105C 60V VW-1 -F- is a 30-pin generic ribbon cable. It connects the main board to the soundboard. It is a generic ribbon cable and can be found in a lot of lengths. The one in the camera is 90mm long. Prices range from $5.00 USD upward.
5. Sound PCB

This is the part responsible for all the analogue sound of the camera apart from the handle mic. The spare part model number is AXM-1002 and it is available currently on Aliexpress for $99 USD. This spare part does not come with the XLR connectors, which are the Neutrik B series female chassis and must be purchased separately.
Correct cable connection
Please don’t make the mistake I did as you might not be as lucky and you might fry the camera main board. The correct cable connection on my handle is as illustrated in the following photo. The Sharpie lines are not on the parts, I just used them to know what the right way is.

Regarding the sizes of the PCBs, these are as per the following diagram

And those are all my findings for now.
I am keen to see if someone uses this information to build an external audio input box, so please feel free to drop me an email ([email protected]) with your finished product.
Good luck!