ProRes RAW is here, a new high-efficiency codec that enables instant playback and editing without the need for any conversion. ProRes codecs have been an industry standard for a long time, but the codecs themselves are getting a little long in the tooth. A testament to how good the ProRes codecs are is that they are still widely used by ARRI as their primary compressed codec options in the Alexa.
ProRes RAW

The performance of ProRes with the flexibility of RAW. What Apple has done is to create a codec that is as easy to use as the existing ProRes options but with the flexibility of RAW. ProRes RAW allows you to import, edit and grade video with RAW data straight from your camera sensor without slowing down your edit. These RAW files provide maximum flexibility for adjusting the look of your video while extending brightness & shadow detail. This makes it a good solution for HDR workflows.
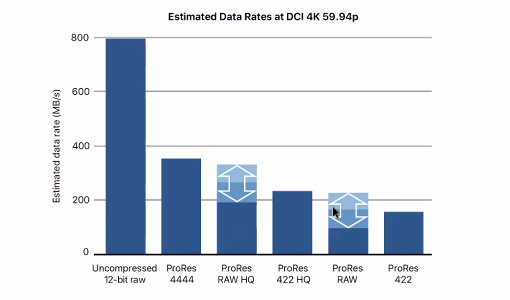
There are two variations of ProRes RAW. ProRes RAW is the equivalent of ProRes 422 HQ in terms of data rate. ProRes RAW HQ is the equivalent to ProRes 4444XQ. The data rate of ProRes RAW HQ is just a fraction of the of uncompressed 12-bit RAW. Both ProRes RAW and ProRes RAW HQ achieve excellent preservation of raw video content, with the additional quality available at the higher data rate of Apple ProRes RAW HQ. Compression-related visible artifacts are very unlikely with Apple ProRes RAW, and extremely unlikely with Apple ProRes RAW HQ. As is the case with existing ProRes codecs, the data rates of ProRes RAW are proportional to frame rate and resolution. ProRes RAW data rates also vary according to image content, but to a greater degree than ProRes data rates.
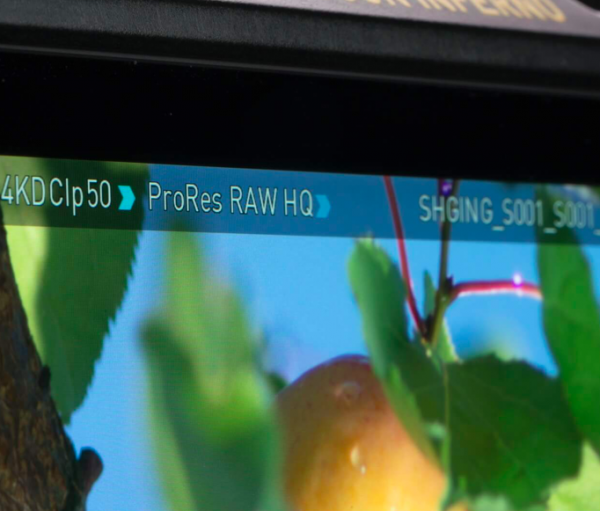
Apple ProRes RAW is based on the same principles and underlying technology as existing ProRes codecs, but is applied to a camera sensor’s pristine raw image data rather than conventional image pixels. ProRes RAW brings to raw video the same great performance, quality, and ease of use that ProRes has brought to conventional video, in an ideal format.
With most video codecs, including the existing ProRes family, a technique known as rate control is used to dynamically adjust compression to meet a target data rate. This means that, in practice, the amount of compression— hence quality—varies from frame to frame depending on the image content. In contrast, ProRes RAW is designed to maintain constant quality and pristine image fidelity for all frames. As a result, images with greater detail or sensor noise are encoded at higher data rates and produce larger file sizes.
ProRes RAW data rates benefit from encoding Bayer pattern images that consist of only one sample value per photosite. Apple ProRes RAW data rates generally fall between those of Apple ProRes 422 and Apple ProRes 422 HQ, and Apple ProRes RAW HQ data rates generally fall between those of Apple ProRes 422 HQ and Apple ProRes 4444.
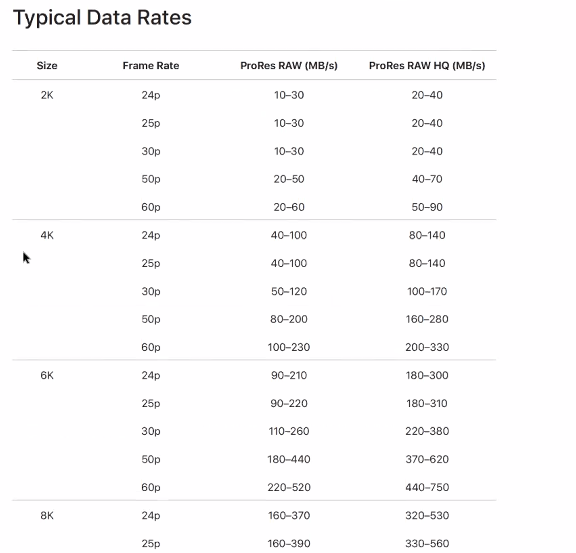
Above you can see the typical data rates you should expect at various resolutions and frame rates.
So how does it actually work?
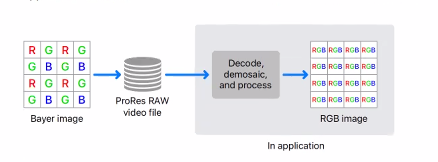
The process of converting a Bayer pattern to a conventional RGB image is known as demosaicing. For conventional video, demosaicing and other processing operations are performed within the camera to produce viewable RGB images that can be recorded to a video file.
At playback time an application needs to decode the conventional video file to produce RGB images that can be edited and displayed. The demosaicing and processing have already been performed by the camera at capture time and are “burned in”.
With ProRes RAW it directly encodes the Bayer pattern image. Demosaicing and processing are deferred to the time of playback and are performed by the application software.
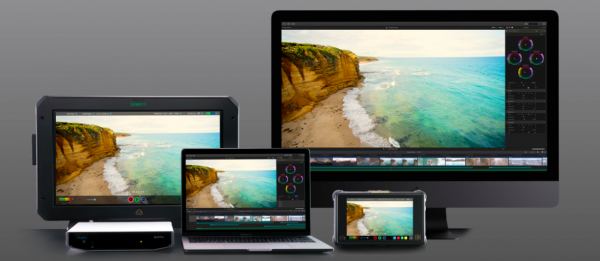
An update for FCPX will also be released on Monday that will enable full support for ProRes RAW. Unfortunately, it isn’t currently being supported by Adobe, Avid or anyone else. If you want to take advantage of ProRes RAW then you will need to be a user of FCPX. We do expect to see the NLE systems to support it in the future.
There are three primary ways to use ProRes RAW with Final Cut Pro in your post-production workflow:
• Using Log Conversion with Built-in Camera LUTs
• Using Log Conversion with Custom LUT Effects
• Grading Directly Without LUTs
Using Log Conversion with Built-in Camera LUTs
Most professional video cameras today support recording in a log format. Using log enables a higher dynamic range of light levels to be represented compared to standard video gamma functions. Because many color-grading workflows are based on working with log video, Final Cut Pro can automatically apply a log conversion setting to ProRes RAW media files during import. With log conversion applied, ProRes RAW files behave just like conventional log video and can be edited the same way.
Using built-in log conversion allows you to color correct ProRes RAW video as if it were SDR or HDR video, depending on your library color-processing setting. When your library is set to Standard color processing, you can color correct ProRes RAW video as if it were SDR video. With your library set to Wide Gamut HDR, you can color correct ProRes RAW video as if it were HDR video.
RAW to Log Conversion Setting
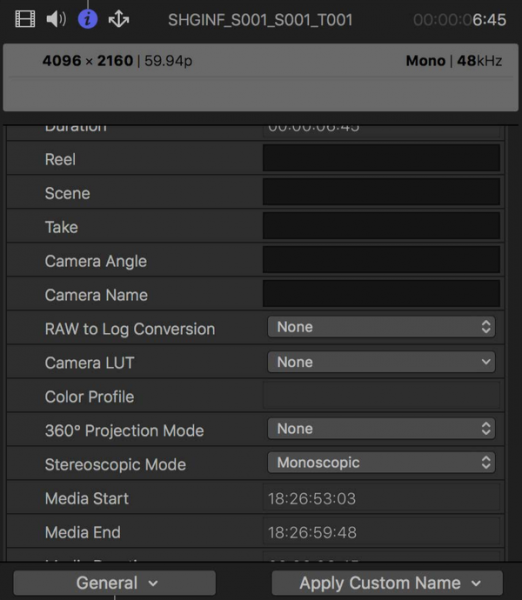
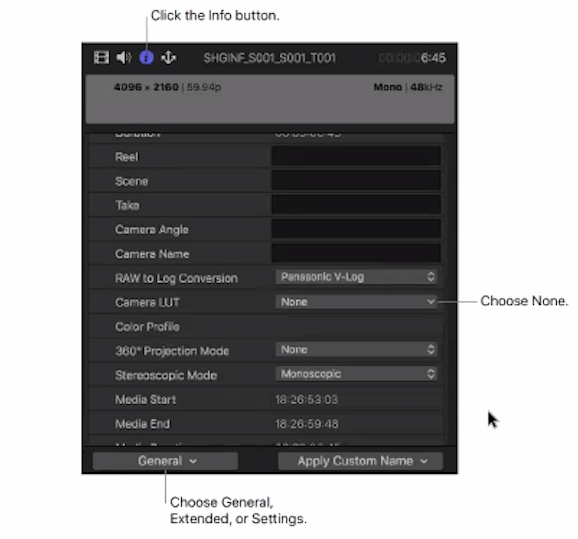
Decoding ProRes RAW directly results in HDR linear values rather than log. The Raw to Log Conversion setting in the Info inspector applies custom log functions created by different camera vendors so that you can color correct
your ProRes RAW files as log video. Because ProRes RAW files contain metadata that identifies the camera manufacturer, Final Cut Pro can apply the correct log function (such as Canon Log 2, Panasonic V-Log, or Sony S-Log3) during import.
Camera LUT Setting
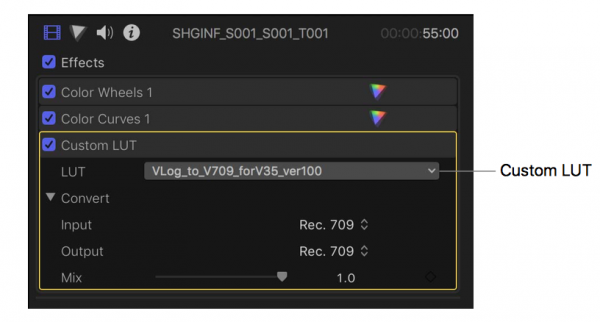
A lookup table (LUT) is a set of data that transforms pixel values to change the way an image looks. Because log video footage initially looks flat, Final Cut Pro can apply a Camera LUT setting to make the image look less flat and more vibrant. It essentially converts the log-encoded image to an image in the intended output color space in a way that looks pleasing to the eye. As with video shot with log encoding, Final Cut Pro automatically applies the Camera LUT setting based on metadata in the file that identifies the camera manufacturer. You can view the Camera LUT setting in the Info inspector.
The type of conversion performed by the built-in camera LUT depends on the library color-processing setting. When color processing is set to Standard, the log conversion applies tone mapping to reduce the original high dynamic range of the log content to a range suitable for SDR video.
You can also manually adjust the RAW to Log Conversion setting in the General, Extended, or Settings view of the Info inspector.
If you want to grade the ProRes RAW video without using LUTS you can. When you do this, no tone mapping is applied to the source, and the full dynamic range is available in the working space, even in libraries set to Standard color processing. Although highlights may initially appear blown out, you can correct this using color correction tools, such as Color Wheels and Color Curves.
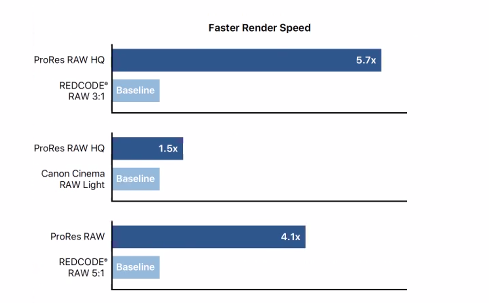
One of the other main benefits of using ProRes RAW is the rendering times. Rendering times for ProRes RAW compared to other RAW recording formats from RED and Canon are dramatically faster. For example, it’s 5.7x faster than rendering RED code 3:1 and 1.5x faster than Canon Cinema RAW Lite that is found in the C200.
Atomos support
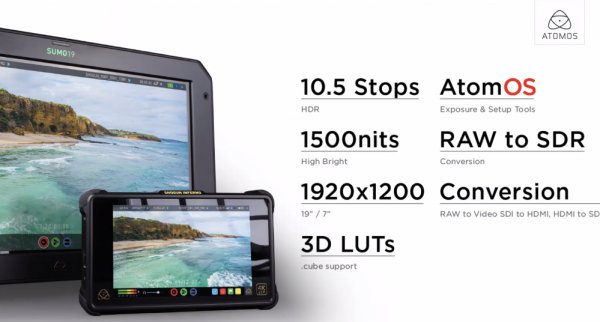
Atomos the first company to support ProRes RAW. From Monday, a free firmware upgrade will be made available for owners of the Shogun Inferno and the Sumo 19. This upgrade will allow users to take the RAW signal from compatible camera and record that in ProRes RAW. Once the firmware is installed, it will allow the user to capture RAW images in up to 12-bit RGB — direct from many of the world’s most advanced cameras onto affordable SSD media. ProRes RAW files can be imported directly into Final Cut Pro 10.4.1 for high-performance editing, color grading, and finishing on Mac laptop and desktop systems.

Atomos doesn’t have an exclusive monopoly on ProRes RAW, DJI will also be implementing the codec into the INSPIRE 2’s Zenmuse X7 camera in May. Just when we will see ProRes RAW implemented into other devices and even cameras are still unknown. Apple is keen to make ProRes RAW an industry standard codec, so I wouldn’t imagine it will be too long before we see it being more widely adopted.
In terms of embedded metadata that will be recorded in the ProRes RAW codec, that will depend on what metadata is coming out of the camera.
Support for ProRes RAW in FCPX will be announced by Apple on Monday 9th. The Shogun Inferno and Sumo 19 free upgrade is backwards compatible and will also be available on Monday. The Shogun Inferno and Sumo 19 are the only Atomos products that can support ProRes RAW.
So what cameras are supported by Atomos?
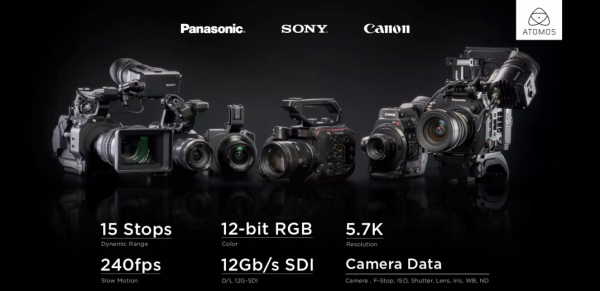
Atomos is going to be able to record ProRes RAW from eight currently available cameras, including the 5.7K RAW signal from the Panasonic EVA1.
Cameras supported:
Canon C300 Mark II
Canon C500
Sony FS700
Sony FS5
Sony FS7/FS7 II
Panasonic Varicam LT
Panasonic EVA1
The colour space and bit depth of the Prores RAW recording is dependent on what the camera is outputting over its SDI. So for example, if your camera is outputting a 12-bit RAW signal, then your ProRes RAW recording will be done in 12-bit. If your camera only outputs RAW in 10-bit, then your recording will be 10-bit.
the Atomos Shogun Inferno and Sumo 19 will both support high frame rate RAW recording from the eight cameras they are currently supporting.
ProRes RAW makes some of these current and older cameras very compelling options. For example, taking an older FS700 that you can pick up for under $2,000 and then add a Shogun Inferno and being able to record ProRes RAW from the FS RAW signal that you can edit immediately makes a lot of sense.
Processing requirements in editing
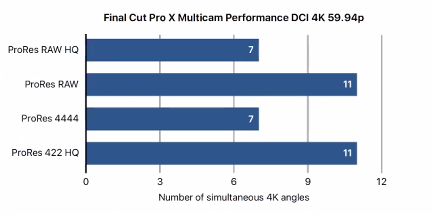
Atomos told me that 6-7 4K 60p streams of ProResRAW HQ can be played I real time on an iMac Pro. In standard ProRes RAW, you can play 11-12 multi-cam 4K 60p streams on an iMac Pro.
Raw video playback requires not only decoding the video bitstream but also demosaicing the decoded raw image. Final Cut Pro includes a streamlined and GPU-optimized demosaicing algorithm designed to meet the performance demands of real-time, multistream video editing.
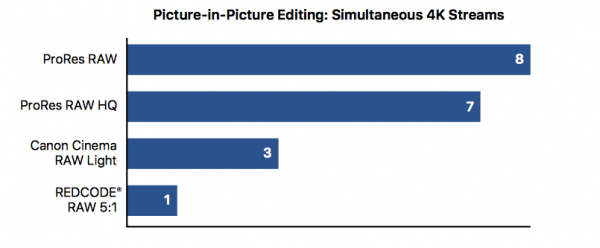
Compared to other raw video formats supported by Final Cut Pro, ProRes RAW offers superior performance in both playback and rendering, as you can see above.
If you had your doubts about FCPX in the past, this new announcement might finally put those fears to bed. With the addition of ProRes RAW Apple has given FCPX a format that no other NLE is currently supporting.
This announcement is a big deal. ProRes has been an industry standard codec since its inception back in 2007, now 11 years later Apple is looking to position ProRes again as the go-to codec.


